10 Spring Home Maintenance Tips
- Carla Bruni, Preservation & Resiliency Specialist

- Apr 5, 2023
- 8 min read
Updated: Aug 31, 2023

Home maintenance can be daunting, to say the least. We recommend breaking things up seasonally as a kind of ritual to welcome a new chapter of the year.
This time of year brings its own unique challenges after roofs, chimneys, and many exterior elements have fought with snow, winds and freeze-thaw cycles for the last few months. Your home will need a little extra love once the world thaws.
While there are certain tasks that lend themselves more to one season than another, there are others that can be done whenever, but are easy to forget! We’ve put together a mix for you below so that some of those “anytime” tasks aren’t forgotten.
10 Spring Home Maintenance Tips

1. Check your shingles. It’s always a good idea to do a walkabout of your home once things warm up, and we’d recommend bringing some binoculars along. Your roof has been working hard to protect you all winter, so do some visual scans for shingles that may have shifted, which indicates that fasteners have failed and need replacing. Are any shingles cracked, curling, or missing? Also look for “nail-pops,” which occur when nails push the tabs of the shingles upward and allow water to come in. It’s far better to catch these issues sooner rather than later!
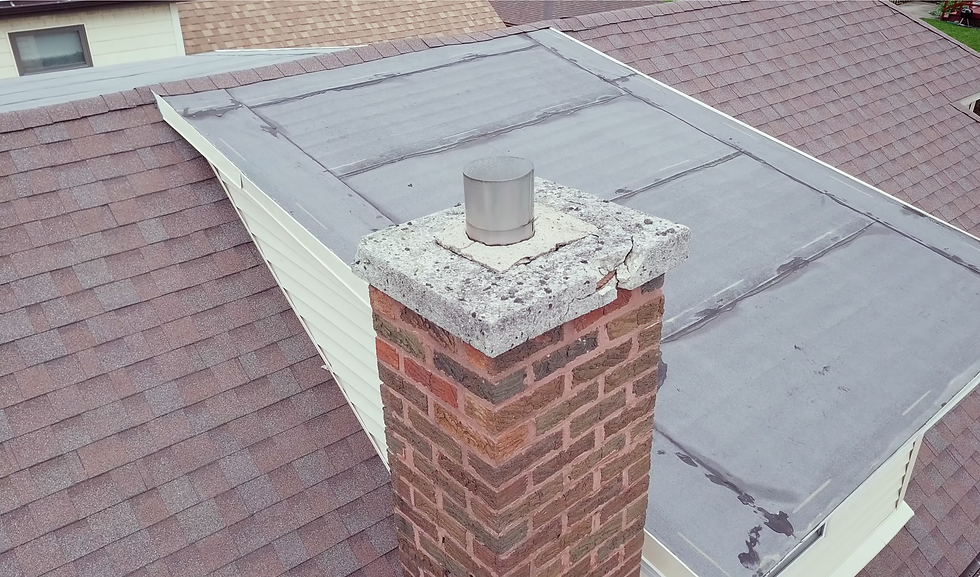
2. Check your chimney. While you’re scoping your shingles, also be sure to check out your chimney, if you have one. If you think closer inspection is needed and go onto your roof for a closer look, make sure there’s no ice or shifting shingles before you step! Look at the joints between the bricks. Has any mortar fallen out? Is there vegetation growing out of the joints? If so, there’s water getting into that wall.
Also, look for efflorescence, which is that white powdery stuff that is often found on the surface of brick. If there’s just a little bit, it may be okay to just watch it and make sure it doesn’t get too extensive. If it’s excessive, the problem could be something serious like a cracked or broken flue liner that will cause rapid brick and mortar deterioration. We recommend having your chimney inspected by a licensed heating contractor or by a certified chimney sweep before the next heating season. Either one will tell you whether you have to install a new chimney flue or liner, or point to any other moisture source that may be causing the excessive efflorescence.

3. Clean and tune your lawnmower. It’s time to pull out the lawnmower and give it a checkup before the grass gets too long. Mowers tend to get a lot of use, but not a lot of love. Send it out for a tune-up annually, if possible, where a small-engine repair company can sharpen the blades, change the spark plug and do any other necessary maintenance. Expect to spend $50 to $75, according to Angie’s List.
If you have a reel (manual) mower, you’ll want to make sure it’s clean and lubricate the moving parts. Nicks can form along the blades from hitting rocks and debris, so they should be sharpened. For more information on how to do this, read your mower manual. And be careful with those blades!

4. Do more than clean the lint trap on your clothes dryer. Built-up lint inside dryer cabinets causes more than 15,000 fires every year! Lint escapes through tiny gaps around the edges of the dryer drum and falls into the cabinet, especially when the exhaust vent or vent cap is clogged and airflow is restricted.
To clean the exhaust duct, shut off the gas and unplug the dryer, then pull the dryer away from the wall and disconnect the duct from the dryer. Use a brush and a vacuum to remove the lint in the duct.
To clean inside the dryer, unplug it and turn off the gas, then open either the top or the front. The procedure is generally the same for gas and electric dryers, but search online or look in your appliance manual to see how to safely open your machine and access the areas needed. Then, brush and vacuum under the drum and at the top and back of the dryer. Clean thoroughly around the heating element, and work gently around wires and mechanical parts. Use a long brush to clean the dryer vent screen, then vacuum it from the top and back.
For more on cleaning out your clothes dryer, click here.

5. Test and flush out your hot water tank. Many homeowners have never thought to do this one, but it matters! To prevent sediment from settling at the bottom and reducing the efficiency of your hot water heater, it should be flushed at least once a year.
If you have a gas system, turn the thermostat to the lowest setting, which should be marked as 'Pilot' and allow it to cool down. For an electric system, you’ll need to turn off the electricity from the breaker box or fuse box before flushing to avoid damaging the water heater.
If possible, turn off the tank the night before to allow the water to cool down—you’ll lower the chances of burning yourself and can use the water stored in the tank for watering plants, etc.
After this, check your manuals or see here for more detailed steps and safety precautions. We would also recommend checking out this helpful YouTube video that walks you through step by step!

6. Clean that refrigerator inside and out! Let’s be real—this is not a fun task, but food can get nasty, as can whatever lies beneath our appliances. Cleaning the coils will also keep that refrigerator humming.
Unplug the fridge
Remove the panel at the bottom of your fridge
Use an angled vacuum hose to gently suck up all that dust and gunk
Replace the front panel
Don’t forget to plug in the fridge back into the wall!
To clean the inside of your fridge:
Pull everything out (this will help you take stock of what you have, but also help you work faster so your food doesn’t spoil), including drawers and shelves.
Wipe off any containers that have schmutz on them so you’re not re-dirtying your fridge when you return the items.
Spray the inside of the fridge with a solution of vinegar and water, with a little extra on the grimier areas, and let it soak in.
Wash the removed shelves and drawers with warm soapy water and set them aside to dry. Head back to the fridge and wipe everything down with a rag.
Dry the shelves and drawers and return them to the fridge, then place all newly cleaned items back in the fridge and feel like you’re a master of adulting.

7. Clean out basement window wells and under decks. We all know that dog toys and rotting leaves (and occasionally a possum that decided it was time for The Big Adios) can find their way down window wells and under front and back porches during the winter. Now that everything has thawed out, it’s time to put on the gloves and grab the rake. Just be sure anything with fur isn’t just resting, and protect yourself from the gunk of life how you best see fit.
Why bother cleaning out under the deck? Leaves that collect there can harbor moisture and serve an inviting habitat for insects and fungi. They're also a fire hazard. Why tackle this chore in the spring? Because the ants, spiders, and assorted other cooties have yet to make their way there! It’s a very different look under there in August.

8. Reseal your deck and fence. Hopefully you sealed all those exterior wood components before winter, as they are particularly vulnerable to winter’s bad moods. It’s always a good idea to clear snow off throughout the winter if possible to minimize any damage.
Two main things will mess with your deck and fence: moisture and cold temperatures. Wood is porous and when left unprotected, these pores are easily filled with water, fungi, and bacteria. As temperatures lower, the water inside the wood contracts, then freezes and expands, which causes the wood to bend and eventually fracture. On top of that, mold and mildew can spread and cause rot.
Once temperatures are steadily warming up and everything dries out, take the following steps:
Pressure wash the wood to blast away any mold or mildew. If you don’t want to hire pressure washing services, you can do this yourself. Just make sure you use the proper detergent, pressure rating, and nozzle for the job so you don’t damage your deck, fence, or trim.
Seal the cracks and gaps using a caulking gun loaded with wood filler/caulk. Be sure to fully fill all gaps and let the material dry before coating the surface with paint, stain, or sealant.
Properly paint, stain, and/or waterproof. Each option has its pros and cons—paint, for instance, is thicker than a stain and seals, and allows for more color variety, but it only protects the wood’s surface. Wood deck sealers, on the other hand, penetrate the wood’s pores, effectively waterproofing it at a deeper level. As an added bonus, most stains and paints also offer some level of UV protection, which is important on those occasional sunny winter days.

9. Inspect sink, shower, and bath caulking for deterioration. Check all these areas in your home for spots that have dried out and deteriorated. Caulk isn’t meant to last forever, but it’s critical if you want to keep water out of your walls and floors (which you definitely do!).
Here are some do's and don'ts of caulking the bathroom:
Make sure that you buy the best caulk for the job. It should be labeled “for bathroom use” or something similar to indicate that it’s waterproof and will resist mold and mildew.
Use a good caulk gun. A quality gun will still be relatively cheap and will allow you to easily manage the flow of the caulk. It should have a durable plunger for pushing the caulk out of the tube and a thumb pressure release that can quickly stop the flow of caulking out of the gun.
DON’T apply new caulk over old caulk. If you skip the step of removing the old stuff, you won’t get a strong bond and this will result in leaks and cracks in your new caulk. Instead, remove the existing caulk using a product like Goo Gone Caulk Remover and/or a simple putty knife.
Use painter’s tape. Painter’s tape allows you to section off the areas that you want to caulk while keeping your tiles, tub, and shower clean. Use long strips of tape to protect the surface of the surrounding area, leaving you free to apply your bead of caulk to your wall, shower, or tub. Also, keep in mind that caulk will not bond to a wet surface, so make sure that your area of work is clean and dry before applying the caulk.
DON’T try to fill large gaps with only caulk. Openings that can be filled with caulk should be a maximum of a quarter-inch in width to a half-inch in depth. Any gaps that are wider or deeper than this should use backing material to fill in the gap and allow the caulk to sit securely across the opening.
Don’t use the bathroom until the caulk has cured. Caulking can harden up quickly, but it is very susceptible to manipulation and damage until it is completely cured. For the best results, allow at least 24 hours after application before using your bathroom.

10. Clean your kitchen exhaust fan. Your kitchen exhaust fan removes grease, smoke, steam, and odors while you cook. In the winter months, with the doors and windows sealed up, that fan is working double time. While it’s easy to ignore this chore, cleaning the fan is critical because grease builds up in the filter and will decrease the effectiveness of the fan. If enough time passes between cleanings, a clogged grease filter can even become a dangerous fire hazard.
Thankfully, cleaning your kitchen exhaust fan can be done quickly, and easily, with common household supplies. For a step-by-step on what to pull out, what detergent you want, what to clean, and how to reassemble, check out this article.
What else do you recommend? Share your spring home maintenance tips below!


Comments